How to create a React + Flask + GraphQL Project
Flask + React Tutorial
12 minute read
()
This post is also available in different formats so you can read on the go or share it around!
What we're making
To demonstrate how to create a React frontend app that communicates with a GraphQL API served by a Flask backend, let's create a simple coffee ordering system.
In this tutorial, our GraphQL API will have:
- a query to get the list of coffee orders
- a mutation for creating a coffee order
Our API will be accessible via an easy to use GraphQL playground and of course from our example React application.
Let's dive in.
Why use this stack?
Python is a very versatile language and there are myriad good choices for web frameworks within the Python ecosystem. It's common for JS developers to be accustomed with working in Node.js but in the real world your backend might be something completely different. This tutorial is to guide you in using React with different web stacks and different languages.
As a professional software engineer, I use Python and the Django web framework at work. It's easy to use and flexible enough to create great maintainable web apps. We're going to be choosing Flask instead for this tutorial, primarily because we want to have a GraphQL API, we don't need any of the extras that Django comes with.
The reason for using Ariadne over Graphene for our GraphQL API is because it allows us to define a schema upfront. Graphene takes a code first approach which has it's pros and cons but a schema first approach works well for our case. We can define our schema upfront and have it "working" and interactive through the playground before we know what our actual models might look like.
What we need
There are a few requirements that you'll need to follow along. As a frontend developer you'll probably be familiar with the requirements on the client. For our backend, we'll keep dependencies to a minimum for simplicity.
Client Requirements
- Node.js: The JavaScript runtime which you'll use to run the frontend React app.
- Yarn or npm: A package manager to install the required dependencies like React.
Server Requirements
There are lots of ways you can install these dependencies so I won't list all of them here but there are a few tools I prefer. I recommend for both Node.js and Python, use a version manager. This takes the hassle out of using multiple versions for different projects. It's especially useful for Python and pip because unlike npm, installing a Python dependencies will be installed globally.
Managing Python versions
For Python, I like pyenv for managing Python versions along with a couple of extensions:
pyenv-virtualenvpyenv-virtualenvwrapper
On macOS, you can install them via brew with:
brew install pyenv pyenv-virtualenv pyenv-virtualenvwrapper
This is how you can install a specific version of Python with pyenv. E.g. use pyenv install 3.5.0 to install Python 3.5.0.
Virtual environments
A virtual environment is useful when you're working on different projects with different dependencies. To avoid installing dependencies globally on your machine, a virtual environment allows you to just install them for what you're working on. This is essential for a good developer experience working with Python.
To create a virtual environment with Python 3.5.0 we simply run:
pyenv virtualenv 3.5.0 my-new-project-env
Now we've created it, we need to activate it for our project:
pyenv activate my-new-project-env
You're all set up and ready to go, let's start on creating server.
If you want to follow along with the code of the final product, take a look ath the Flask GraphQL React example project on GitHub.
Create a Flask backend
The first step is to setup a Flask app to act as our backend server. It will host our GraphQL endpoint but right now we'll make sure it's setup to receive a simple GET request. Let's create a folder for our server and client to sit:
mkdir flask-graphql-react
cd flask-graphql-react
touch server.py
We have a folder with a single file within it, server.py. Now, in your favourite text editor let's make our server do something.
from flask import Flask

app = Flask(__name__)


@app.route('/')
def hello_world():
    return 'Hello, World!'

if __name__ == '__main__':
    app.run()
If you've never used Flask before, I hope it's understandable what's going on. We import Flask so we can start our server.
That's done with app = Flask(__name__).
The important piece of setup is our first route.
It's a function that just returns a string, "Hello, World!". We tell Flask to call this function at a particular route suing a decorator, @app.route('/').
Install Flask with pip install flask and let's run our server to make sure it's working with python server.py.
Navigate to localhost:5000 in your browser and you should see a blank screen with the text "Hello, World!".

Now that we have a working server, let's make it do something more interesting.
Setup GraphQL with Flask (the first pass)
To help us create a GraphQL API with minimal effort, we're going to use Ariadne; the schema-first Python library.
Let's install it with pip install ariadne and start hooking it up to our Flask server.
GraphQL with Ariadne
To connect Ariadne to our Flask server, we'll do the following:
- Import the functions we need from Ariadne
- Setup schema
- Create a playground endpoint
- Create a GraphQL endpoint
Import
Our imports change quite a bit. We need to import some extra functions from Flask to handle JSON serialization and deserialization.
from flask import Flask, request, jsonify
Next, we'll import some helper functions from ariadne to turn a GraphQL schema and some resolvers into a usable API.
from ariadne import graphql_sync, make_executable_schema, gql, load_schema_from_path
We'll also import PLAYGROUND_HTML, this is a useful tool for writing, testing and learning about our GraphQL API.
One of the many benefits of the API is that is self-documenting and has a great developer experience.
It allows us to serve an endpoint which is accessible so we can run queries and mutations in a playground environment.
This isn't strictly necessary but it's very useful for development.
from ariadne.constants import PLAYGROUND_HTML
We're also going to need some resolvers. Some way of telling our server what a query or mutation should do and what data it should return.
To achieve this, we'll create a new file called model.py and import it.
from model import query
Setup
Let's setup our schema (which we haven't created yet) with our first types (query, which we also haven't created yet)
type_defs = gql(load_schema_from_path("./schema.graphql"))
schema = make_executable_schema(type_defs, query)
We load our schema to create our type definition with load_schema_from_path. We also call gql which validates the schema and will let us know if anything's wrong.
Then we make it executable by combining the type definition with query, our resolvers for all queries.
Playground
Let's serve a new route, we don't need our hello_world anymore, we'll serve something far more useful.
@app.route("/graphql", methods=["GET"])
def graphql_playground():
    return PLAYGROUND_HTML, 200
Once we have a simple schema and resolvers, you'll be able to visit localhost:5000/graphql in the browser and see something like this.

Endpoint
Now we can serve our single GraphQL endpoint. We'll serve it from /graphql as is convention but this time, it will be a POST method.
@app.route("/graphql", methods=["POST"])
def graphql_server():
    data = request.get_json()

    success, result = graphql_sync(
        schema,
        data,
        context_value=request,
        debug=app.debug
    )

    status_code = 200 if success else 400
    return jsonify(result), status_code
Our graphql_server endpoint works like this, we get the json request and pass it into graphql_sync along with the schema.
We'll also give it the request as the context_value in case we want to make use of something outside of the query, within a resolver.
On success, we serialize the response and send it back to the client.
The server we have so far
This is what our server will look like now.
from flask import Flask, request, jsonify
from ariadne import graphql_sync, make_executable_schema, gql, load_schema_from_path
from ariadne.constants import PLAYGROUND_HTML
# The model is where we'll define our resolvers
from model import query

# We'll create this schema soon
type_defs = gql(load_schema_from_path("./schema.graphql"))
schema = make_executable_schema(type_defs, query)

app = Flask(__name__)

@app.route("/graphql", methods=["GET"])
def graphql_playground():
    """Serve GraphiQL playground"""
    return PLAYGROUND_HTML, 200


@app.route("/graphql", methods=["POST"])
def graphql_server():
    data = request.get_json()

    success, result = graphql_sync(
        schema,
        data,
        context_value=request,
        debug=app.debug
    )

    status_code = 200 if success else 400
    return jsonify(result), status_code


if __name__ == '__main__':
    app.run(debug=True)
You'll notice I also added debug=true to app.run so we can get more logging information during development.
If you attempt to run the server right now, we'll get a few errors because we haven't made our schema or the model file yet.
Create a GraphQL Schema
Let's create a simple GraphQL schema to get started. We can expand on it later but first, we'll make sure everything is setup correctly with our server.
type Query {
  hello: String!
}
We're almost there. This simple GraphQL schema we've defined contains single field called hello, a string.
Our first GraphQL resolver
We've defined a field in our schema but now we need to have the field resolve to something. Let's see how to achieve this with Ariadne.
Using QueryType
We'll import the QueryType class from ariadne. We can then create a new instance and use it to create our resolver.
from ariadne import QueryType

query = QueryType()
Resolving the hello field
To resolve the field, we create a resolve_hello function that returns a string. Then we can tell Ariadne that this is a resolver for the field hello.
This is the most simple resolver we can make. It doesn't use any parameters and simply returns "Hi there".
@query.field("hello")
def resolve_hello(_, info):
    return "Hi there"
Now that this final piece of the puzzle is complete, start the server and test it out! Navigate to the playground localhost:5000/graphql and try it out.
The following query should return the subsequent data.
Querying our GraphQL API
query {
  hello
}
Response from our query
{
  "data": {
    "hello": "Hi there"
  }
}
We know our API and the server is working as expected so we can turn our attention to expanding the scope of the API and making something a little more useful.
Expand the GraphQL schema and add a migration
The example app which we want to create involves ordering coffee. So let's define how our Coffee type will look and what fields will be available to our API.
Create a coffee type and orders field
There are a few fields a Coffee order could have so let's create some simple ones like size, type of coffee, the name of the person on the order and an ID so we can distinguish between orders. I created a couple of enums to restrict the choices and showcase how we might build out a GraphQL schema utilising types other than strings.
enum Size {
  SMALL
  REGULAR
}

enum CoffeeType {
  CAPPUCCINO
  FLAT_WHITE
  ESPRESSO
}

type Coffee {
  id: String!
  size: Size!
  name: String!
  type: CoffeeType!
}

type Query {
  orders: [Coffee]!
}
We now have a new field, orders which will return a list of coffee orders. We'll need to create a resolver for this new field.
Simple types and rewriting the resolver
Make a simple class to represent the coffee type defined in the schema. This allows us to work with a Python object on the backend and make it easy to create the coffee order later on.
A plain old python Coffee class
The Coffee class is pretty simple, the only addition we'll add is a an automatically generated ID using uuid4. This gives us a unique ID every time we create an order.
from uuid import uuid4

class Coffee:
   def __init__(self, size, name, coffee_type):
       self.size = size
       self.name = name
       self.type = coffee_type
       self.id = uuid4()
The orders resolver
For this tutorial we'll simply store the orders we create in memory. We don't need to over complicate the project with databases.
We'll also update our hello_world resolver to return the orders.
orders = []

@query.field("orders")
def resolve_orders(_, info):
    return orders
Trying to query the API now will technically work but you'll always receive an empty array because there are no orders and there's no way to create orders from the API.
Let's change that by writing our first mutation.
Our first GraphQL mutation
We'll create our first mutation for ordering a coffee. To achieve this, we'll take the following steps:
- Add the mutation to the schema
- Write the resolver
- Connect the mutation to our schema
Add a new mutation to the schema
Crate a new orderCoffee mutation in the GraphQL schema. We'll allow the user to specify the type of coffee, the size they want and their name to associate with the order.
It will return a Coffee, this allows the client to get a valid ID which has been assigned to that coffee order.
type Mutation {
  orderCoffee(size: Size!, name: String!, type: CoffeeType!): Coffee
}
Using MutationType
To start using mutations we need to import the MutationType class from ariadne. Then, just like with the QueryType, we'll instantiate it for use as a decorator.
from ariadne import QueryType, MutationType

mutation = MutationType()
Let's tell our schema what the mutation actually does.
Write the mutation
Let's write the actual mutation. Define a function that accepts the arguments defined in the schema.
Notice the third, fourth and fifth parameters of the function match the first, second and third arguments in the schema.
The info parameter contains the context which we supply from the request, but it's not needed for this resolver.
Our mutation will create a new order, append it to the orders list and then return it.
@mutation.field("orderCoffee")
def resolve_order_coffee(_, info, size, name, type):
    newOrder = Coffee(size, name, type)
    orders.append(newOrder)
    return newOrder
The final step to get our mutation into the API is to make it executable.
Add the mutation to our executable schema
From model.py, import the mutation. This contains the resolver for the orderCoffee mutation.
Then we pass mutation to make_executable_schema which completes the setup.
from model import query, mutation

schema = make_executable_schema(type_defs, query, mutation)
Now you should be able to create orders using the new mutation and query the list of orders using the playground. Our simple coffee ordering API is complete, let's turn our attention to the frontend of our application.
Before we progress, our project has expanded so for organisational purposes I moved model.py and server.py into a subfolder called server.
Create a React app with create-react-app
With a working GraphQL API to use, we'll create the client - a React SPA. To get up and running quickly I'm using create-react-app.
Now, we can scaffold out a project with npx create-react-app client. This will create a new React app in a directory called client.
To test it's working, navigate to client, install the dependencies with yarn and run the server with yarn start. At localhost:3000 you'll see a fresh React app.
It doesn't do anything useful right now so let's change that.
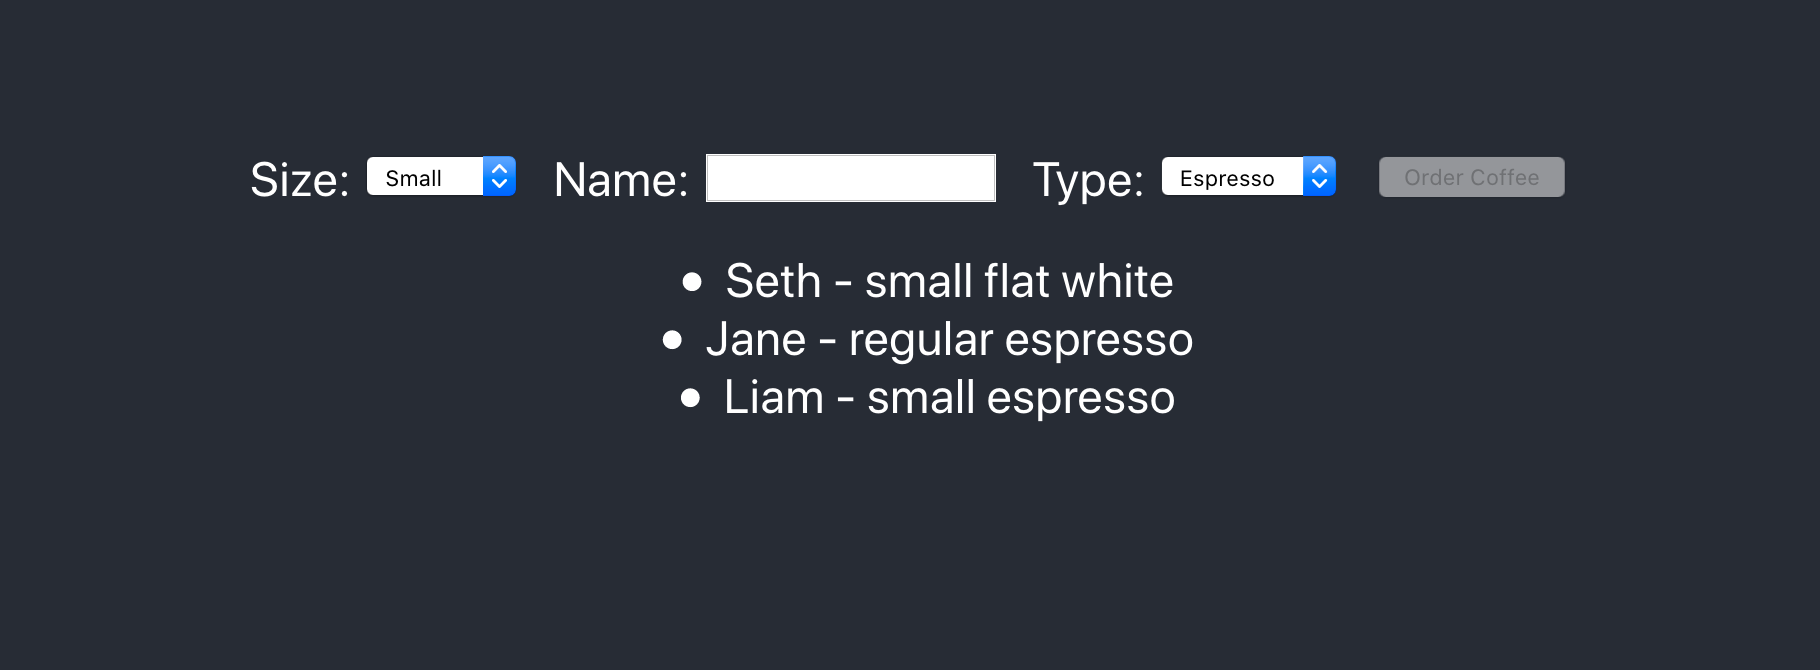
A simple React UI
The example we're creating is a simple coffee ordering interface so we need some UI to allow the user to crete an order. We're going to be using everything builtin to React and the browser, there will be no third party dependencies for the frontend project to make things easy to understand.
Create a simple React form
To handle the user input, we'll make a form and store the state in order using the useState hook.
Once a coffee order is made, we also need to add it to the list of orders to display in the UI.
We'll do this, again using the useState hook with a default argument being an empty array to represent no orders having been made yet.
function App() {
  const [myOrders, setMyOrders] = useState([])
  const [order, setOrder] = useState({
    size: "SMALL",
    type: "FLAT_WHITE",
    name: "",
  })

  function onSubmitOrderForm(e) {
    e.preventDefault()

    // Let's create this API call shortly
    orderCoffee(order.size, order.name, order.type, ({ orderCoffee }) => {
      setMyOrders([...myOrders, orderCoffee])
    })
  }

  return (
    <div className="App">
      <header className="App-header">
        <form onSubmit={onSubmitOrderForm}>
          <label>
            Size:
            <select
              onChange={({ target }) =>
                setOrder({ ...order, size: target.value })
              }
            >
              <option value="SMALL" defaultValue>
                Small
              </option>
              <option value="REGULAR">Regular</option>
            </select>
          </label>
          <label>
            Name:{" "}
            <input
              type="text"
              onChange={({ target }) =>
                setOrder({ ...order, name: target.value })
              }
            />
          </label>
          <label>
            <select
              onChange={({ target }) =>
                setOrder({ ...order, type: target.value })
              }
            >
              Type:
              <option value="FLAT_WHITE" defaultValue>
                Flat White
              </option>
              <option value="ESPRESSO">Espresso</option>
            </select>
          </label>
          <input type="submit" value="Order Coffee" />
        </form>
        <ul>
          {myOrders.map(order => (
            <li id={order.id}>
              {order.name} - {order.size.toLowerCase()}{" "}
              {order.type.split("_").join(" ").toLowerCase()}
            </li>
          ))}
        </ul>
      </header>
    </div>
  )
}
Notice our <form> element is doing the submission, onSubmitOrderForm will be called when the user adds a new coffee order by clicking the Order Coffee button.
Let's take a look at how we might actually call the mutation, orderCoffee, on our GraphQL endpoint.
Communicating between client and server
We'll be using the Fetch API to make a post request to our backend.
You'll notice something interesting however, we're calling this endpoint /graphql which will be on localhost:5000 but our client is being served from localhost:3000 in development.
This is because we'll proxy the API call, in production the backend could serve the frontend or both servers could be run behind something like Nginx Reverse Proxy but during development we want quick turn around and the proxy feature of create-react-app suits these purposes perfectly.
function orderCoffee(size, name, type, cb) {
  fetch(`/graphql`, {
    method: "POST",
    headers: {
      "Content-Type": "application/json",
    },
    body: JSON.stringify({
      query: `mutation {
        orderCoffee(size: ${size}, name: "${name}", type: ${type}) {
          id
          name
          type
          size
        }
      }`,
    }),
  })
    .then(res => res.json())
    .then(res => cb(res.data))
    .catch(console.error)
}
If we try and run this code, the API call will fail, that's because we need to setup our proxy.
Proxying our API
My favourite built-in feature of create-react-app is the proxy. It allows any request which the client server can't handle, be redirected to the endpoint defined in the in the proxy.
For us, this means we can post to /graphql and it will resolve to localhost:5000/graphql which is our GraphQL API.
To set this up, simply add this line to the package.json like so.
{
  "name": "client",
  "proxy": "http://localhost:5000"
}
You can now run both client and server to start our application. From the frontend, you'll be able to request a coffee order which will be created on the backend. The orders are currently created locally to be displayed so if we refresh the page, our previous orders won't show up even though they do exist. Let's fix this by querying our API for the list of orders when we visit the web app.
Fetching the orders
Create a new function to query the orders from the API. Just as before, we'll use fetch but this time the payload will be a query.
function getOrders(cb) {
  fetch(`/graphql`, {
    method: "POST",
    headers: {
      "Content-Type": "application/json",
    },
    body: JSON.stringify({
      query: `query {
        orders {
          id
          name
          type
          size
        }
      }`,
    }),
  })
    .then(res => res.json())
    .then(res => cb(res.data.orders))
    .catch(console.error)
}
Now we can hook it up to our container component.
We want to fetch the orders when the app mounts so we'll use the useEffect hook and set the state when we get a response.
useEffect(() => {
  getOrders(data => setMyOrders(data))
}, [])
Refresh the page and notice the orders we made will display as expected.
Conclusion
There it is, we've created a simple Flask backend to serve our GraphQL API and use it with a simple React application on the frontend. We made a specific API for a hypothetical coffee ordering system which allows querying the list of orders and creating new orders.
I hope you found this tutorial interesting and helpful.
This is one of many ways we can combine the power of React with other backends and technologies to create web apps that are fun to develop and great to use.
Resources
- Source code for this project is available, Flask GraphQL React example project on GitHub
- Flask Documentation
- Ariadne Documentation

Currently a Senior Product Engineer at zeroheight. Actively designing and building the agentic systems that respond to tools like Figma to update your design system documentation automatically as well as a flexible platform to manage agents.